Cinnamon Crumb Coffee Cake
One thing my husband and I have in common is that we both LOVE coffee cake. It's probably because it's 90% sugar (which I found out when I made this recipe), but I don't care. This cake was so good, I'm glad there's not a lot of it because I need it out of my life ASAP. I have a technique when I have sweets in the house that the faster I eat them, the faster they're gone. Smart, right? Well, not really during quarantine because I just keep making sweets. But if it makes my husband and I happy for a little bit, I guess it's worth it. Remember, I have my new saying - count steps, not calories. So yes, I've been indulging a little more than normal, but I'm also working out 7 days a week.
So don't be afraid to treat yo self with this delicious coffee cake with crumb topping. Again, I'm an amateur baker, so I get all of my recipe inspiration from Pinterest. I try not to totally copy recipes without giving the original baker credit because that wouldn't be fair, but I also like to change things up a little bit too. So this original recipe came from Go Go Go Gourmet, but I changed up 2 little things to make it my own. The first thing I changed is that I added nutmeg to both the topping and the filling. I think of cinnamon and nutmeg as two peas in a pod and I rarely add cinnamon without adding a dash of nutmeg. The one thing I do want to warn you about is that nutmeg is a very pungent spice and a little goes a long way. So in the photos below, you can see the difference in the amount of cinnamon vs. nutmeg added and the recipe just calls for "dashes" of nutmeg. I definitely could have gone heavier on the nutmeg, but I was afraid to overdo it.


So don't be afraid to treat yo self with this delicious coffee cake with crumb topping. Again, I'm an amateur baker, so I get all of my recipe inspiration from Pinterest. I try not to totally copy recipes without giving the original baker credit because that wouldn't be fair, but I also like to change things up a little bit too. So this original recipe came from Go Go Go Gourmet, but I changed up 2 little things to make it my own. The first thing I changed is that I added nutmeg to both the topping and the filling. I think of cinnamon and nutmeg as two peas in a pod and I rarely add cinnamon without adding a dash of nutmeg. The one thing I do want to warn you about is that nutmeg is a very pungent spice and a little goes a long way. So in the photos below, you can see the difference in the amount of cinnamon vs. nutmeg added and the recipe just calls for "dashes" of nutmeg. I definitely could have gone heavier on the nutmeg, but I was afraid to overdo it.

The second change was that I baked my coffee cake in a loaf tin (9x5") rather than a 9x9" pan. The reasoning for this? Well, honestly it's because I don't own a 9x9"pan, so I had to improvise. I like how tall the pieces of cake turned out, but I think the cake ended up being a little more dense because of the height. So yes, I would recommend sticking with the 9x9" pan, but don't fret if you only have a loaf tin. This cake was still absolutely delicious. I'd be lying if I said we didn't dig into a piece of this cake immediately before eating dinner because we just couldn't resist.
Total Time: 1 hour and 15-1 hour and 30 minutes
Servings: 6-8
Ingredients:
For the cake:
1 stick butter, softened
3/4 cup sugar
1 tsp vanilla
1 egg
2 cups flour
2 tsp baking powder
3/4 cup milk (regular or almond)
pinch of salt
For the filling:
3 tbs butter, softened
1 tbs cinnamon
3 dashes of nutmeg
1/2 cup flour
1/2 cup packed brown sugar
For the topping:
5 tbs butter, softened
3/4 cup flour
1/2 cup packed brown sugar
1 tbs cinnamon
3 dashes of nutmeg
Instructions:
- Preheat your oven to 350° F
- Cream together your butter and sugar in a medium bowl. Once thoroughly combined, add the vanilla and egg.
- In a separate bowl, combine flour, baking powder, and a pinch of salt. Add 1/2 the dry mixture to the wet mixture. Stir until combined, add milk, and then add the other 1/2 of the flour mixture.
- In a separate bowl, mix the filling ingredients together until combined.
- Add the topping ingredients to a food processor and pulse to combine.
- Grease your baking pan and add 1/2 the cake batter, ensuring it's spread evenly and all the way to the edges of the pan.
- Sprinkle the filling evenly over the cake batter and then pour the rest of the batter on top.
- Sprinkle the topping evenly over the top of the cake.
- If using a 9x9" baking pan, bake for 45-50 minutes. Since the cake on the 9x5" pan will be thicker, it will need more time to bake. Mine was perfect at 58 minutes.
- Remove from the oven and place on a cooling rack. Let cake cool until room temperature before cutting.
I think I've mentioned this a million times already, but again, I'm an amateur baker and I don't have all the fancy gadgets, so I do everything by hand. I creamed together the butter and sugar using a spatula because it was all I had. Yes, it takes a little bit of arm strength, especially if your butter isn't 100% soft, but you'll get the same result in the end.

I'll admit, I'm not good at reading instructions. So here's a picture of my mistake. I added 1/2 of my wet mixture to my dry. Don't be like me. Read the instructions and follow them. Okay, so it's not the worst thing in the world to be like me because the cake still turned out great, but just do it the right way.

Here's what the dough looked like when fully combined. Luckily, my mistake didn't cost me!

Here's where you can see the sprinkle of nutmeg I added to the filling. The dark brown scoop on the top is the cinnamon and the sprinkle on the bottom is the nutmeg. As I mentioned earlier in the recipe, I definitely could have gone a little heavier on the nutmeg, so you can do a little more than this if you want.

Here's the filling all mixed together. Now, it's important that you keep track of which bowl you made the filling vs. the topping in. They look pretty similar once they're mixed together, so don't switch them up!

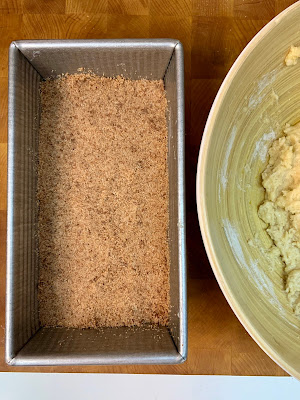
Assembly time! I used my rubber spatula here to gently push the mixture into the corners of the pan. You don't want to press down to firmly though because you don't want a dense cake.

Top your cake with the filling and then add the rest of the cake batter.


Again, I baked my cake in a 9x5" pan because it was all I had, so my cake turned out a little dense, but still super moist and tasty. How good does that look with the crumb topping and the melty filling layer? Pretty drool worthy if you ask me.

And as my husband pointed out, I'm a sucker for the up close in focus and blurry background photos. But how was I NOT supposed to show you a close up of this bite? 🙈

So there you have it, the best coffee cake you'll ever eat. While coffee cake can be eaten for breakfast, we've been enjoying it as a dessert because there's so much sugar in it. Believe it or not, there's not actually any coffee in coffee cake. I'm not sure why they call it coffee cake then, but I do think it would taste delicious with a nice cup of black coffee to counterbalance the sweetness.
Happy baking!


Comments
Post a Comment